11/23/04 Michael Phelps: The Crossover or Modified Roll Turn With
Pullout (backstroke to breaststroke transition turn in the IM)
Michael Phelps demonstrates the difficult crossover or modified roll turn from
backstroke, the following breaststroke pullout and the breakout.
By Kevin Milak Demonstrated by Michael Phelps Photos by Kevin Milak
Before the rule change that allowed a rollover turn on backstroke, the modified
roll turn was the quickest way to turn from backstroke to breaststroke in the
IM. However, this turn has not faded into technique history as "what we used to
do before they changed the rule." Many elite athletes continue to use this turn
during IM transitions from back to breast.
The rule regarding backstroke to breaststroke transition turns states:
The swimmer must touch the wall while on the back. Once a legal touch has been
made, the swimmer may turn in any manner, but the shoulders must be at or past
the vertical toward the breast when the swimmer leaves the wall, and the
prescribed breaststroke form must be attained prior to the first arm stroke.�
In this article, we will be taking an underwater view of this difficult turn,
the following breaststroke pullout and the breakout. Not only will we have a
fish-eye view of the turn, but it will be demonstrated by the best IM swimmer
in the world, Michael Phelps.
How To Do It:
|
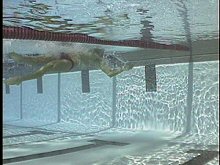
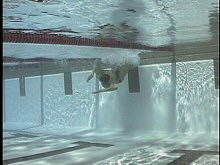
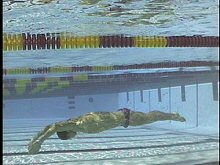
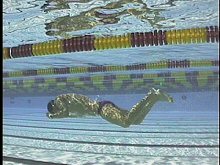
Approaching The Wall
Swim into the wall the same way you would approach the wall for a backstroke
flip turn. Your distance from the wall when you initiate the turn should be
slightly less than it is for your normal backstroke turn. This may require you
to lengthen your last several stroke cycles slightly in order to get yourself
closer to the wall (Photo #1).
|
|
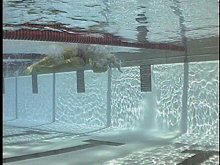
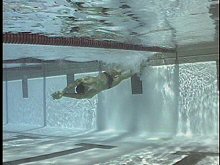
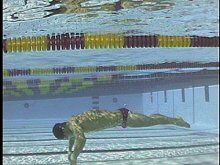
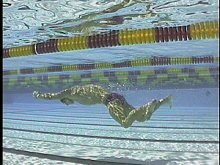
On the last arm stroke, instead of rolling over onto
the chest, your body will roll halfway onto the chest so that you are
perpendicular to the bottom of the pool, with your chest facing the lane line.
Your last arm stroke (Michael's right arm) will reach behind your head (Photo
#2).
|
|
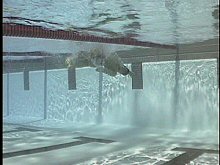
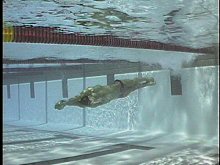
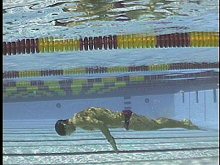
Touch And Roll
Drive into the wall, bringing your hand and forearm behind your head. During
this final moment before you make contact with the wall, you must be careful
not to let your shoulders pass vertical (which would be illegal). Plant your
hand fairly deep on the wall, just behind your opposite shoulder (Michael's
left shoulder). Your fingers will be pointed down and behind you (if the wall
were a clock, Michael's fingers would be pointed at 7 o'clock), with the palm
of your hand flat on the wall (Photo #3).
|
|
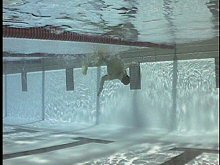
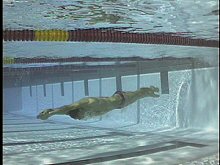
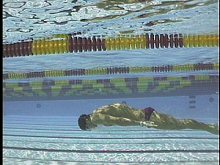
Once your hand is on the wall, continue to roll onto
your stomach and somersault. Bring your other arm (the one that did not touch
the wall; Michael's left) down toward the bottom of the pool, which will help
you to bring your body into alignment and stop you from flipping too far (Photo
#4).
|
|
Roll onto your side�not all the way onto your
stomach�as your feet come in contact with the wall. Your feet should be
relatively high on the wall, fairly close to the surface, and your toes should
be pointed parallel to the surface. Bring your arm that came in contact with
the wall overhead to meet your other arm so that you can get ready to push and
streamline (Photo #5).
|
|
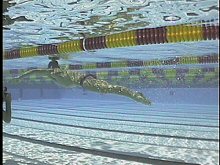
Push and Stretch
Push off on your side with your eyes looking toward the side of the pool,
tightening your streamline as your legs straighten. Streamline with your elbows
close together behind your head and your torso flexed and straight (Photo #6).
|
|
Push and Stretch As you get set up for your
pullout, rotate onto your stomach by turning in a corkscrew motion as you push
off the wall. Your legs should be squeezed together with your toes pointed.
Make sure to exhale as you streamline, so that you do not float to the surface
before you are ready to make your breakout. Be sure not to hold your streamline
so long that your body begins to lose momentum and slow down (Photos #7 and
Streamline).
|
|
The Pulling Phase
The arm motion of the pullout can be described as an exaggerated butterfly
stroke: the pull and press of the arm strokes are very similar motions. Begin
to sweep your hands out with the palms pitched slightly outward and upward so
that the hands are outside the shoulders. Once your hands are outside the
shoulders, the palms of the hands will begin to face backward. This motion is
primarily a stretch to get your hands into the correct position for the next
catch of the pull (Photos #8 and #9).
|
|
Flex and bend your elbows nearly 90 degrees until
your hands nearly come together under your chest. Then press the water under
your body from the point at which your hands pass under your chest until they
pass by your navel, accelerating your hands as they go through the pull.
Throughout most of this phase, your hands will be close together, with your
thumbs and index fingers forming a diamond pattern (Photo #10).
|
|
The final phase of the pull is the upsweep, where
your hands push out from under your body to push slightly upward. Your hands
will stop against your thighs, with your fingers pointed down your leg. This
final part of the pull should be the fastest your hands will move during the
pullout. During the momentary glide, shrug your shoulders and squeeze your arms
close to your sides (Photo #11).
|

|
Kick to Surface and Arm Recovery
The closer you can recover your hands and forearms to the body, the less drag
you will encounter. Flex your elbows enough that your arms move forward with
your hands almost sliding across your body. As your arms are passing under your
stomach, your feet should begin to recover by bending your knees slightly. Your
feet should recover very gently so as not to cause too much drag (Photos #12
and #13).
|
|
Use the propulsive phase of the kick to finish the
recovery of the arms. Your body should be close to the surface, and as soon as
your arms are back up into a streamline, they should begin to press outward to
begin the first breaststroke pull. Your eyes should always be looking down
throughout the entire pullout, from streamline to breakout. You will only begin
to raise your eyes during the first breath of the first stroke cycle of
breaststroke (Photos #14 and Breakout).
|